Let's Get Authorization Done by OAuth 2.0
What is OAuth 2.0?
OAuth 2.0 is an open-standard authorization protocol or framework that provides applications the ability for “secure designated access.” For example, you can tell Facebook that it’s OK for ABC.com/application to access your profile or post updates to your timeline without having to give ABC.com your Facebook password. This minimizes risk in a major way: In the event ABC.com suffers a breach, your Facebook password remains safe. This is known as secure, third-party, user-agent, delegated authorization.
Parameters
In order to redirect the user to GitHub sign in page, in Application login button onClick, the bellow code will get executed.
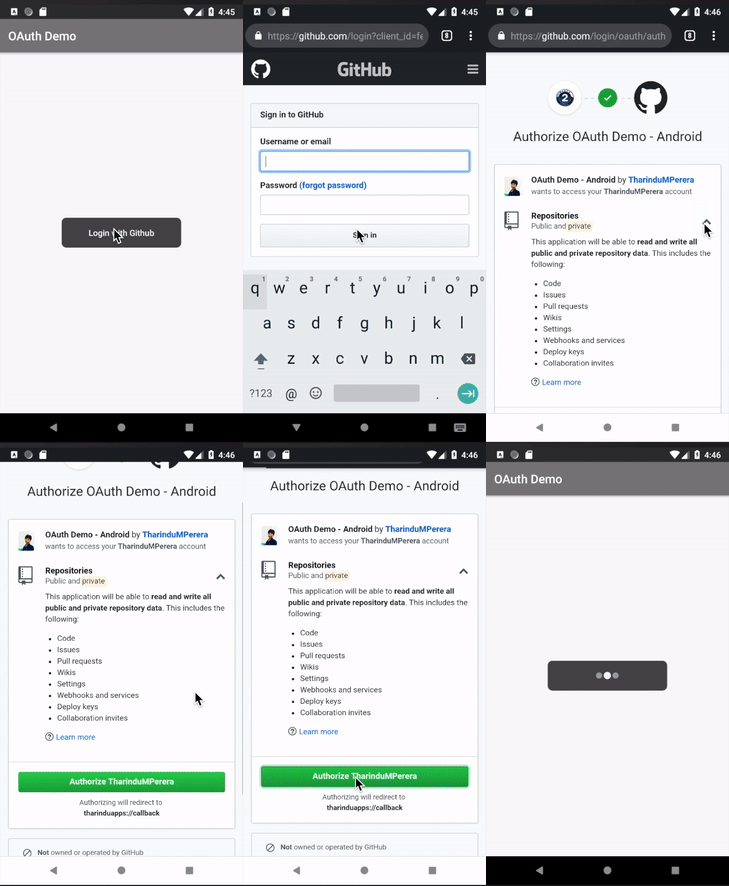
Once user is redirected to Github login page, user has to log into Github and grant consent for the provided scope (in our application the scope is repo)
If the user accepts the request, GitHub triggers a callback with a temporary code in a code parameter. In order to catch the authorization code provided as a query parameter the in callback url, we have to define an Intent Filter inside the Activity in the AndroidManifest.xml and catch the authorization code onResume in the activity
Let's implement API service in the application to make the POST request.
Let's modify the API service in the application to fetch repos from GitHub API.
Full implementation can be found on GitHub.
How it works?
Let's get started with OAuth Roles 👀
- Resource Owner - the user who authorizes an application to access their account.
- Client - the application that wants to access the user's account.
- Resource Server - hosts the protected user accounts.
- Authorization Server - verifies the identity of the user then issues access tokens to the application.
There are five types of grants specified in the OAuth 2.0 specification
- Authorization grant
- Implicit grant
- Resource owner credentials grant
- Client credentials grant
- Refresh token grant
1. Authorization grant
Let's build an Android application to demonstrate this
1. Create a GitHub application.
Go to https://github.com/settings/developers and create a new OAuth App.
The authorization code will be passed as a query parameter in the provided callback url. For more information read GitHub OAuth documentation.
Once the application is created, a Client ID and a Client Secret will be provided.
2. Obtain the authorization code.
Assume you have initiated an Android project.
In order to obtain an authorization code, a GET request should be made to the following URL with the bellow parameters.
GET https://github.com/login/oauth/authorize| Name | Type | Description |
|---|---|---|
client_id | string | Required. The client ID you received from GitHub when you registered. |
redirect_uri | string | The URL in your application where users will be sent after authorization. See details below about redirect urls. |
scope | string | A space-delimited list of scopes. If not provided, scopedefaults to an empty list for users that have not authorized any scopes for the application. For users who have authorized scopes for the application, the user won't be shown the OAuth authorization page with the list of scopes. Instead, this step of the flow will automatically complete with the set of scopes the user has authorized for the application. For example, if a user has already performed the web flow twice and has authorized one token with user scope and another token with reposcope, a third web flow that does not provide a scope will receive a token with user and repo scope. |
state | string | An unguessable random string. It is used to protect against cross-site request forgery attacks. |
allow_signup | string | Whether or not unauthenticated users will be offered an option to sign up for GitHub during the OAuth flow. The default is true. Use false in the case that a policy prohibits signups. |
In order to redirect the user to GitHub sign in page, in Application login button onClick, the bellow code will get executed.
Once user is redirected to Github login page, user has to log into Github and grant consent for the provided scope (in our application the scope is repo)
If the user accepts the request, GitHub triggers a callback with a temporary code in a code parameter. In order to catch the authorization code provided as a query parameter the in callback url, we have to define an Intent Filter inside the Activity in the AndroidManifest.xml and catch the authorization code onResume in the activity
3. Obtain the access token using authorization code.
In order to get the access token a POST request should be made to the following URL with the bellow parameters.POST https://github.com/login/oauth/access_token| Name | Type | Description |
|---|---|---|
client_id | string | Required. The client ID you received from GitHub for your GitHub App. |
client_secret | string | Required. The client secret you received from GitHub for your GitHub App. |
code | string | Required. The code you received as a response. |
redirect_uri | string | The URL in your application where users are sent after authorization. |
4. Consume the API using the token.
The obtained access token allows the app to make requests to the API on behalf of the user.Let's modify the API service in the application to fetch repos from GitHub API.
Full implementation can be found on GitHub.
______________________________________________________________
Tip: Understand the concept well. Then you will be able to develop better applications.


Comments
Post a Comment